Getting started
Learning objectives
- You know what Firebase is.
Beyond using APIs, databases, and on-device memory with shared preferences, our applications have not had a backend (i.e. a server) that they could have relied on. In this part, we'll look into using a Backend as a Service (BaaS) called Firebase, which provides functionality that can be used to support our applications. Firebase offers a free tier that, when carefully used within the context of the course, is sufficient for our needs, but allows growing the application later on.
In this example, we'll be building a note-taking application that allows users to create, edit, and delete notes, and that uses Firebase for storing the notes. The notes are stored in a Cloud Firestore database, and the users are authenticated using Firebase Authentication.
Follow the example by setting up your own project and testing the application out step by step -- the final outcome is an application that looks as follows: https://fitech101.github.io/notes-app/.
Before getting started with Firebase, let's set up a simple notes application that we can use as a starting point.
Creating a project
We'll start by creating a new Flutter project called flutter_notes_app using flutter create.
flutter create flutter_notes_app
Creating project flutter_notes_app...
Running "flutter pub get" in flutter_notes_app...
Resolving dependencies in flutter_notes_app... (1.3s)
..

All done!
You can find general documentation for Flutter at: https://docs.flutter.dev/
Detailed API documentation is available at: https://api.flutter.dev/
If you prefer video documentation, consider: https://www.youtube.com/c/flutterdev

In order to run your application, type:

  $ cd flutter_notes_app
  $ flutter run

Your application code is in flutter_notes_app/lib/main.dart.
When created, the lib folder has only one file, main.dart.
Creating a model
We'll start by creating a Note class that will represent a note. Create a folder models into the lib folder and create a file note.dart inside it. Place the following contents to the folder -- the class represents a note with an id and content field.
class Note {
  final String id;
  final String content;

  Note({required this.id, required this.content});
}
We'll use String as the type for both the id and the content. Contrary to commonly used numeric identifiers in databases, we'll be using an UUID-based identifier.
Creating a provider
Let's next create a provider for the notes. We'll first add riverpod, flutter_riverpod, and uuid to the project depedencies (i.e. the pubspec.yaml file). After modifications, the depedencies part of the pubspec.yaml is as follows.
dependencies:
  flutter:
    sdk: flutter

  cupertino_icons: ^1.0.2
  flutter_riverpod: ^2.4.0
  riverpod: ^2.4.0
  uuid: ^4.0.0
Then, we'll create a provider for the notes. Create a folder providers to the lib folder, and create a file called note_provider.dart to the folder providers. Place the following contents to the file -- the class represents a provider that is used to create and delete notes.
import 'package:flutter_riverpod/flutter_riverpod.dart';
import 'package:uuid/uuid.dart';
import '../models/note.dart';

const uuid = Uuid();

class NoteNotifier extends StateNotifier<List<Note>> {
  NoteNotifier() : super([]);

  void addNote(String content) {
    final newNote = Note(id: uuid.v4(), content: content);
    state = [...state, newNote];
  }

  void deleteNote(String id) {
    state = state.where((note) => note.id != id).toList();
  }
}

final noteProvider =
    StateNotifierProvider<NoteNotifier, List<Note>>((ref) => NoteNotifier());
Creating a screen
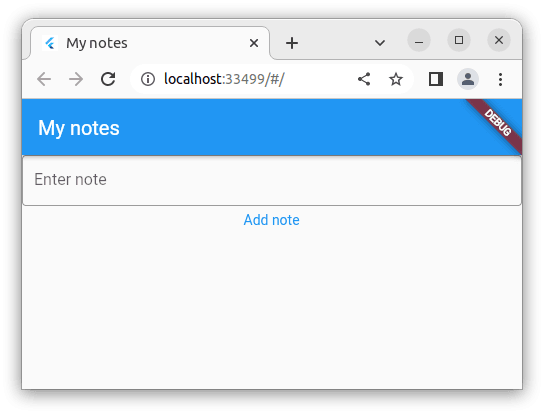
Let's next create a screen that will be used to create and delete notes. Create a folder screens to the lib folder, and create a file called note_screen.dart to the folder screens. Place the following contents to the file -- the class shows a screen with the text "My notes" that has two widgets -- one for adding notes and one for listing the notes.
import 'package:flutter/material.dart';
import 'package:flutter_riverpod/flutter_riverpod.dart';
import '../providers/note_provider.dart';
class NoteScreen extends StatelessWidget {
Widget build(BuildContext context) {
return Scaffold(
appBar: AppBar(
title: const Text('My notes'),
),
body: Column(
children: [AddNoteWidget(), Expanded(child: NoteListWidget())],
),
);
}
}
class AddNoteWidget extends ConsumerWidget {
Widget build(BuildContext context, WidgetRef ref) {
final _controller = TextEditingController();
return Column(
children: [
TextField(
controller: _controller,
decoration: const InputDecoration(
hintText: 'Enter note',
border: OutlineInputBorder(),
),
maxLines: null,
),
TextButton(
onPressed: () {
if (_controller.text.trim().isEmpty) return;
ref.watch(noteProvider.notifier).addNote(_controller.text);
_controller.clear();
},
child: const Text('Add note'),
),
],
);
}
}
class NoteListWidget extends ConsumerWidget {
Widget build(BuildContext context, WidgetRef ref) {
final notes = ref.watch(noteProvider);
return ListView.builder(
itemCount: notes.length,
itemBuilder: (context, index) {
final note = notes[index];
return Card(
child: ListTile(
title: Text(note.content),
trailing: IconButton(
icon: const Icon(Icons.delete),
onPressed: () =>
ref.watch(noteProvider.notifier).deleteNote(note.id),
),
),
);
},
);
}
}Most of the code is familiar to us from the course already, but there are a few additional small things. First of all, when setting the maxLines property of the TextField to null, the text field will grow as the user types more text. Second, the ListView.builder is a convenience constructor that allows creating a list of widgets from a list of data. The itemBuilder function is called for each item in the list, where the function returns a widget representing the item. The itemCount property on the other hand is used to tell the builder the number of items in the list.
Adjusting main
Now that we have the model, the provider, and the screen, we can glue them together in the main.dart file. Replace the contents of the file with the following code -- the code creates a MaterialApp that uses the NoteScreen as the home screen.
import 'package:flutter/material.dart';
import 'package:flutter_riverpod/flutter_riverpod.dart';
import 'screens/note_screen.dart';
void main() {
runApp(ProviderScope(child: NotesApp()));
}
class NotesApp extends StatelessWidget {
Widget build(BuildContext context) {
return MaterialApp(
title: 'My notes',
home: NoteScreen(),
);
}
}When we run the application, the notes application looks similar to the one shown in Figure 1.
