Traffic Distribution and Load Balancing
Learning Objectives
- You know what load balancing means and know that there are different types of load balancers.
- You know common load balancing strategies.
- You know how to setup a load balancer for a Docker project.
When learning to work with multiple servers, we ended up in a situation with multiple replicas of a Docker service, each running at a specific port. The situation was similar to the NASA web server from the 1990s, where each mirror website had its own address. While in our case, a user would need to know the port to access, in NASAs case, a user needed to know the server URL to visit.
Ideally, there would be no need to know about these specific ports or address, and users would be shown the contents from a server at a single port (and address). Even better, it would be nice if users would be directed to a server that is currently experiencing only little load. This is where load balancing comes into play.
Load balancing
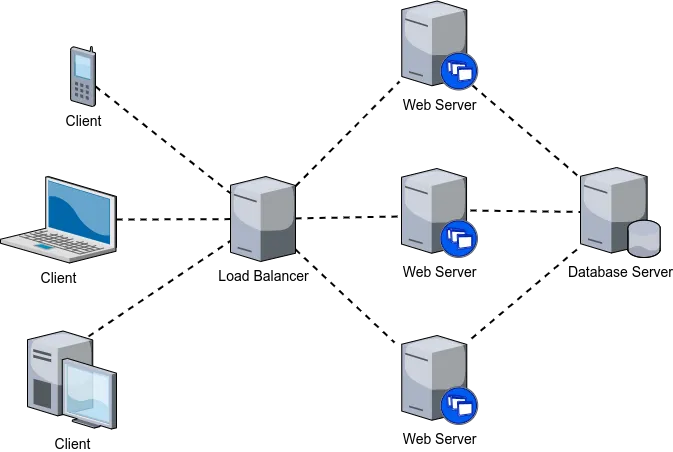
Load balancing means distributing traffic (i.e., requests) across multiple servers. It is used to share work between available servers for the purposes of avoiding the situation, where an individual server is overwhelmed with work. Load balancing is realized by using a load balancer, which is a concrete piece of hardware (or software) responsible for directing incoming requests. Figure 1 provides an example of a load balancer (and load balancing). In Figure 1, incoming requests go to a load balancer, which then distributes the work across the servers.
There exists a wide variety of load balancers, each intended for specific use cases. These include application-level (OSI Layer 7) load balancers, transport-level (OSI Layer 4) load balancers, DNS load balancers, hardware load balancers, global server load balancers, cloud-based load balancers, and so on.
From these, for our present purposes, we focus on application-level and transport-level load balancers.
Application-level load balancers
Application-level load balancers operate at the application layer of the OSI model (layer 7). They are responsible for distributing traffic to servers based on the content of the request. As they work on the application level, they have access to information such as the URL, cookie, and header values.
Application-level load balancers can also be used for managing secure connections. In practice, when application-level load balancers are used for managing secure connections, the connection between the client and the load balancer is encrypted, while the connection from the load balancer to the individual servers is not encrypted. This frees up resources from the servers, while providing a centralized entrypoint for maintaining a secure connection.
Transport-level load balancers
Transport-level (also network-level) load balancers on the other hand operate at the transport level of the OSI model (layer 4). Similar to the application-level load balancers, they are responsible for distributing traffic to servers. However, instead of using content of the request, transport-level load balancers use protocol-level information such as the IP address and port number for distributing traffic.
When compared to application-level load balancers, transport-level load balancers are faster and simpler, as they make decisions based on a smaller set of data. Due to this, they can handle a large number of connections and requests. Due to their efficiency, transport-level load balancers are also useful for handling denial of service attacks, where the application is bombarded with large numbers of requests; as a remedy, load balancers can be configured to e.g. rate limit connections or to limit connections per ip.
Comprehensive protection against distributed denial of service attacks requires more than just load balancing. For example, it is common to use a combination of load balancing, firewalls, and intrusion detection systems to protect against such attacks. In addition, it is also common to use cloud-based services for mitigating denial of service attacks.
Load balancing strategies
Load balancing strategies determine how a load balancer distributes incoming requests to Docker service replicas. The chosen strategy can significantly impact system performance and reliability. Factors influencing the choice include the number of service replicas, request types, and desired performance metrics.
Common load balancing strategies include:
- Random selection: Requests are directed to a server at random. This strategy is simple and effective for distributing load across servers.
- Round-robin: Requests are distributed in a cyclic order to each server. This strategy ensures that each server receives an equal share of requests over time.
- Sticky sessions: Requests from the same client are directed to the same server using e.g. IP hashing. This strategy is useful for maintaining session state across requests.
- Least connections: Requests are directed to the server with the fewest open connections. This strategy helps balance the load by distributing requests to servers with available capacity.
- Fastest response time: Requests are directed to the server with the fastest response time. This strategy helps optimize performance by routing requests to the most responsive server.
There are also advanced strategies such as weighted load balancing where servers are assigned weights based on their capacity, and dynamic load balancing where servers are monitored in real-time to adjust routing based on server load. Further, some load balancers can perform health checks to monitor server status and adjust the routing decisions based on the status, ensuring that traffic is sent only to healthy instances.
Setting up a load balancer
To concretely understand how load balancing works, let’s set up load balancing to our walking skeleton. We will use Traefik as our load balancer. Traefik is a relatively new load balancer, which is easy to set up and use. It is also cloud-native — we’ll look at what that means later on in the course.
Follow along the example, setting up Traefik as a load balancer for the walking skeleton. At the end, there is an exercise that expects that you have set up Traefik.
Setting up Traefik
To setup Traefik, we need to add a new service to our compose.yaml file. The file will be responsible for routing incoming requests to the services we have already set up. Add the following service called “traefik” to the compose.yaml file:
services:  # ...
  traefik:    image: traefik:v3.3    command:      - "--api.insecure=true"      - "--providers.docker=true"    ports:      - "8080:8080"    volumes:      - "/var/run/docker.sock:/var/run/docker.sock:ro"  # ...
Now, restart the walking skeleton using docker compose up --build. If all goes well, you should be able to access the Traefik dashboard at http://localhost:8080 — the dashboard should show the services that are currently running.
Note that the above configuration is for learning (and development) purposes only. As an example, in a production environment, the
--api.insecure=trueflag should not be used, as it allows anyone to access the Traefik dashboard.
Service discovery
The visibility of Docker services in the Traefik dashboard is enabled by the --providers.docker=true flag in Traefik’s configuration. Additionally, Traefik requires read access to the Docker socket at /var/run/docker.sock, enabling it to monitor and retrieve labels from Docker services.
Service discovery mechanism:
- Labels: In Docker Compose, labels are key-value pairs attached to services. These labels provide metadata that Traefik uses to dynamically configure routing rules.
- Dynamic Configuration: Traefik continuously listens for Docker events and updates its routing configuration in real-time based on the labels attached to services. This means that adding, removing, or updating services in Docker will automatically reflect in Traefik’s routing behavior without manual intervention.
As an example, when a new service is deployed with specific Traefik labels, Traefik detects the service via the Docker provider and sets up appropriate routers and services to handle incoming traffic based on those labels.
The service discovery capability ensures that Traefik remains in sync with the Docker environment, adjusting routing configurations when needed as services change.
Entrypoint for web
To route incoming requests to the Docker services, we need to define an entrypoint in Traefik’s configuration. An entrypoint specifies the port and protocol that Traefik listens to for incoming traffic. For testing purposes, let’s configure Traefik to listen on port 12345 for web traffic. Modify the Traefik service definition in your compose.yaml file as follows:
services: traefik: image: traefik:v3.3 command: - "--api.insecure=true" - "--providers.docker=true" - "--entrypoints.web.address=:12345" ports: - "8080:8080" - "12345:12345" volumes: - "/var/run/docker.sock:/var/run/docker.sock:ro"Now, the entrypoint web is configured to listen on port 12345 for incoming requests, and the port mapping “12345:12345” maps the container’s port 12345 (web traffic entrypoint) to the host’s port 12345.
Restart the walking skeleton with docker compose up --build. Once restarted, you should be able to access the Traefik dashboard at http://localhost:8080 and send requests to the web entrypoint at http://localhost:12345.
When we make a request to http://localhost:12345, we receive a response with a 404 status message.
curl -v localhost:12345// ...> GET / HTTP/1.1// ...< HTTP/1.1 404 Not Found// ...404 page not foundNow, we have the starting point for routing traffic.
Routing traffic
When using Traefik, we can route traffic to our services by using labels. Labels are key-value pairs that are added to the service definition in the compose.yaml file, and that are used to configure the service in Traefik.
Traefik has a concept of routers and services. Routers are responsible for routing incoming requests to the services. Services are responsible for defining how the requests are handled. In our case, we want to route the requests that are incoming to the Traefik entrypoint web (on port 12345) to the server service. Furthermore, as the server service has two replicas, we want to have a load balancer that distributes the requests to the replicas.
To achieve this, we need to add labels to the server service definition in the compose.yaml file. Modify the server service definition to match the following:
server: build: server restart: unless-stopped volumes: - ./server:/app env_file: - project.env depends_on: - database ports: - 8000-8001:8000 deploy: replicas: 2 labels: - "traefik.enable=true" - "traefik.http.routers.server-router.entrypoints=web" - "traefik.http.routers.server-router.rule=PathPrefix(`/`)" - "traefik.http.services.server-service.loadbalancer.server.port=8000"With the above labels, we first state that Traefik is enabled for the service. Next, we define a router called server-router that listens to the web entrypoint. The router is configured to route requests that match the prefix ”/” (i.e., all paths) to the service called server-service.
In effect, we tell Traefik to route all incoming requests to the port 12345 to the
serverservice.
Then, we define the service server-service that is responsible for handling the requests. The service is configured to use a load balancer that distributes the requests to the server replicas that each use the port 8000.
Now, when we restart our walking skeleton using docker compose up --build, we should be able to access the server at http://localhost:12345. When we make a few requests to http://localhost:12345, we should see responses from both server replicas.
curl -v localhost:12345// ..< X-Replica-Id: 22ff4d1e-95c7-4530-9e76-b3b9b98b951c// ...{"message":"Hello world!"}%curl -v localhost:12345// ..< X-Replica-Id: b5fee3b6-f165-4b2b-9d3c-5f221bfc7997// ...{"message":"Hello world!"}%As we can see, the requests are distributed to the server replicas — this is the essence of load balancing.
Streamlining configuration
Let’s clean up the compose.yaml a bit to streamline the configuration and to ensure that traffic is properly routed through Traefik without exposing container ports directly. First, remove the direct port mappings from server to prevent exposing the server’s internal ports (8000-8001) to the host — we want to rely on Traefik for routing and load balancing.
server: build: server restart: unless-stopped volumes: - ./server:/app env_file: - project.env depends_on: - database deploy: replicas: 2 labels: - "traefik.enable=true" - "traefik.http.routers.server-router.entrypoints=web" - "traefik.http.routers.server-router.rule=PathPrefix(`/`)" - "traefik.http.services.server-service.loadbalancer.server.port=8000"Then, change the entrypoint for web traffic to port 8000 and ensure that only Traefik listens on this port, handling all incoming requests.
traefik: image: traefik:v3.3 command: - "--api.insecure=true" - "--providers.docker=true" - "--entrypoints.web.address=:8000" ports: - "8080:8080" - "8000:8000" volumes: - "/var/run/docker.sock:/var/run/docker.sock:ro"Once ready, restart the services with docker compose up --build, and verify that the service server is now available at http://localhost:8000.
curl -v localhost:8000// ...{"message":"Hello world!"}%By removing the direct port mappings from the server service and consolidating traffic routing through Traefik’s defined entrypoints and routers, the setup easens scaling. Now, all external traffic flows through Traefik, which can route and balance requests to the Docker service replicas, regardless of how many replicas there are.
A note on terminology
At this point, there is some overlapping in the terms, which can be confusing. To clarify the terminology, here’s a small Docker and Traefik glossary:
| Term | Description |
|---|---|
| Docker Service | An abstraction in Docker Compose that defines how to deploy containers, including the number of replicas, networks, and volumes. |
| Docker Container | A lightweight, standalone, and executable package of software that includes everything needed to run an application. |
| Entrypoint (Traefik) | A configuration in Traefik that specifies the port and protocol Traefik listens to for incoming traffic. |
| Port Mapping | The association between a container’s internal port and a port on the Docker host, allowing external access to the container’s services. |
| Router (Traefik) | A component in Traefik that defines how incoming requests are matched and directed to backend services based on rules. |
| Service (Traefik) | Defines the backend instances (e.g., Docker services) that handle requests routed by routers. It includes load balancing configurations. |
| Label (Docker) | Key-value pairs attached to Docker services used for metadata and configuration purposes, such as defining Traefik routing rules. |
| Load Balancing | The process of distributing network or application traffic across multiple servers to ensure reliability and performance. |
| Service Discovery | The mechanism by which Traefik automatically detects and configures routing for Docker services based on labels and real-time events. |