Cloud Deployment Examples
Learning Objectives
- You know some cloud computing providers that offer Kubernetes and Serverless computing as a service.
- You know the basics of creating a Kubernetes cluster and a Serverless application on a cloud provider.
There exists a wide variety of cloud computing providers that offer Kubernetes as a service. These include Scaleway, AWS, Google Cloud, Azure, and Digital Ocean. Here, we’ll briefly look into deployment to an online cloud provider.
The screenshots have been taken in 2023, so the flow might have changed.
In the example, we’ll use Google Kubernetes Engine with autopilot.
If you want hands-on experience by following the example, you’ll need a credit card. If you provide credit card details, make sure to dismantle all experiments once you’ve tried them out to avoid unnecessary billing.
Concretely doing the deployment is not required in this course.
Deployment using Kubernetes
Creating a project on Google Cloud
We start by logging into (and registering if needed) into Google Cloud and creating a new project. We’ll call the project dab-kubernetes-autopilot-demo (you could name the project anything you want).

Once the project has been created, select the project in the dashboard. Next, clicking on the link “APIs & Services”, we choose “Enable APIs and Services”. This opens up an API library that allows us to enable APIs for the project. For the present project, we enable the “Kubernetes Engine API” and the ” Artifact Registry API”.
Creating a cluster
Next, with the Kubernetes Engine API and the Google Container Registry API enabled, we can create a cluster. The cluster is created in the Kubernetes Engine dashboard at https://console.cloud.google.com/kubernetes/, shown in Figure 2.
In the dashboard, we click the “Create” button and choose the “Autopilot” option, where the cluster is managed by Google. This opens up a wizard, that is used to create the cluster, and that guides through the steps of creating a cluster.
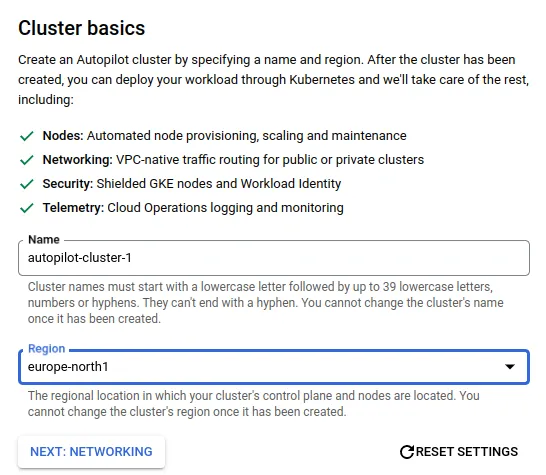
When setting up the cluster, we use the default name from the wizard (here, autopilot-cluster-1) and select europe-north1 as the region for the cluster. These settings are shown in Figure 3 above. We use the default options for networking and advanced settings, and in the review and create -step, we click the “Create cluster” button to create the cluster. It takes a while for the cluster to be created.
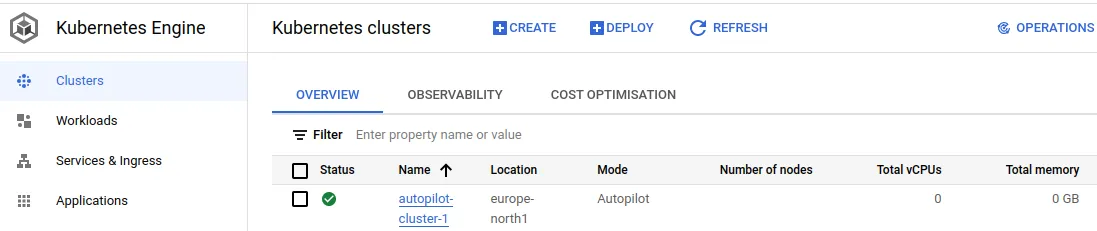
Once the cluster has been created, it is in the list of visible clusters. At the present stage, as shown in Figure 4, there are no nodes, no vCPUs, and the cluster does not use any memory.
Creating a repository for Docker images
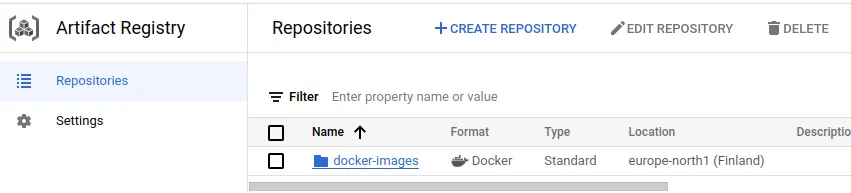
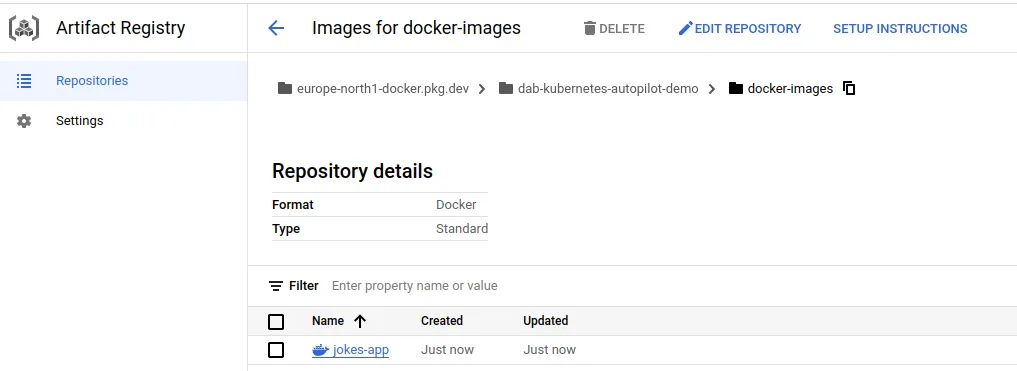
Next, we open up the artifact registry at https://console.cloud.google.com/artifacts and create a new repository for Docker images by clicking “Create repository”. When creating the repository, we call the repository “docker-images”, select “Docker” as format, choose “Standard” mode and “Region” as location type. As the region, we’ll choose europe-north1. We use the default encryption (Google-managed encryption key). Once the options have been provided, we click “Create” to create the repository.
Once the repository has been created, it is in the list of visible repositories, shown in Figure 5.
Creating an application
For the purposes of the example, we’ll create a simple application that responds to requests with a joke. The application is written in vanilla Deno. The app.js for the application is as follows:
const jokes = [  "What did baby corn say to mama corn? -- Where's pop corn?",  "Why are eggs bad at handling stress? -- They crack under pressure.",];
const server = `Server ${Math.floor(10000 * Math.random())}`;
const handleRequest = async (request) => {  const joke = jokes[Math.floor(Math.random() * jokes.length)];
  return new Response(`${server}: ${joke}`);};
Deno.serve({ hostname: "0.0.0.0", port: 7777 }, handleRequest);
And the Dockerfile is as follows.
FROM denoland/deno:alpine-2.0.2
EXPOSE 7777
WORKDIR /app
COPY . .
CMD [ "run", "--unstable", "--allow-net", "app.js" ]
Creating the image and pushing it to the repository
When in the folder that contains the above files, we run the command docker build -t jokes-app ., creating an image jokes-app of the application.
docker build -t jokes-app .... => => naming to docker.io/library/jokes-appNext, we need to install Google’s Cloud CLI gcloud, which provides command-line functionality for maintaining projects on Google Cloud. With the gcloud installed, we authenticate to the project by running the command gcloud auth login. This opens up a browser window, where we can log in to the Google account that is associated with the project. Once logged in, we can close the browser window.
Next, we authenticate to the specific artifact registry by running the command gcloud auth configure-docker europe-north1-docker.pkg.dev, where europe-north1-docker.pkg.dev is refers to the location of the artifact registry (selected when creating the repository). Running the command updates our Docker configuration to utilize the gcloud command when pushing images.
gcloud auth configure-docker europe-north1-docker.pkg.devAdding credentials for: europe-north1-docker.pkg.devAfter update, the following will be written to your Docker config file located at [/home/username/.docker/config.json]: {  "credHelpers": {    "europe-north1-docker.pkg.dev": "gcloud"  }}
Do you want to continue (Y/n)?
Docker configuration file updated.
Next, we tag the image by running the command docker tag jokes-app europe-north1-docker.pkg.dev/dab-kubernetes-autopilot-demo/docker-images/jokes-app:latest. The tag is in the format europe-north1-docker.pkg.dev/<project-id>/<repository-name>/<image-name>:<tag>.
docker tag jokes-app europe-north1-docker.pkg.dev/dab-kubernetes-autopilot-demo/docker-images/jokes-app:latestAnd finally, we push the image to the registry using the command docker push europe-north1-docker.pkg.dev/dab-kubernetes-autopilot-demo/docker-images/jokes-app:latest.
docker push europe-north1-docker.pkg.dev/dab-kubernetes-autopilot-demo/docker-images/jokes-app:latestThe push refers to repository [europe-north1-docker.pkg.dev/dab-kubernetes-autopilot-demo/docker-images/jokes-app]...latest: ...Now, when we visit the artifact registry and open up the docker-images repository, we see the image jokes-app in the list of images, as shown in Figure 6.
Deploying an image
Next, it’s time to deploy the image. Let’s create a deployment configuration file jokes-app-deployment.yaml with the following content.
apiVersion: apps/v1kind: Deploymentmetadata: name: jokes-app-deployment labels: app: jokes-appspec: selector: matchLabels: app: jokes-app template: metadata: labels: app: jokes-app spec: containers: - name: jokes-app image: europe-north1-docker.pkg.dev/dab-kubernetes-autopilot-demo/docker-images/jokes-app:latest ports: - containerPort: 7777 resources: requests: cpu: "250m" memory: "500Mi" limits: cpu: "250m" memory: "500Mi"The key difference to our earlier deployment configurations is that we now use the image from the artifact registry and that the requested resources differ to some extent from our prior efforts. The above limits are related to the autopilot resource requests.
Cluster access is provided to kubectl by running the command gcloud components install kubectl. This installs the kubectl command-line tool. Next, we run the command cloud container clusters get-credentials autopilot-cluster-1 --zone europe-north1 --project dab-kubernetes-autopilot-demo. This updates the kubectl configuration to point to the cluster in our project.
cloud container clusters get-credentials autopilot-cluster-1 --zone europe-north1 --project dab-kubernetes-autopilot-demoFetching cluster endpoint and auth data.kubeconfig entry generated for autopilot-cluster-1.Finally, we can apply our configuration to deploy the image to the cluster. This is done by running the command kubectl apply -f jokes-app-deployment.yaml in the folder where the configuration file is located.
kubectl apply -f jokes-app-deployment.yamldeployment.apps/jokes-app-deployment configuredNow, when we check out the pods, we see that a pod is running.
kubectl get podsNAME READY STATUS RESTARTS AGEjokes-app-deployment-7cb766f44f-vwgk2 1/1 Running 0 4m21sExposing a service
The next step is to expose the deployment. Let’s create a service configuration file jokes-app-service.yaml with the following content.
apiVersion: v1kind: Servicemetadata: name: jokes-app-servicespec: type: LoadBalancer ports: - port: 7777 targetPort: 7777 protocol: TCP selector: app: jokes-appAnd apply the configuration.
kubectl apply -f jokes-app-service.yamlservice/jokes-app-service createdNow, when we list services running the command kubectl get services, we see that the service is running.
kubectl get servicesNAME TYPE CLUSTER-IP EXTERNAL-IP PORT(S) AGEjokes-app-service LoadBalancer 10.42.0.3 34.88.159.3 7777:30574/TCP 2m53s..The external IP address is the IP address of the load balancer. We can use this IP address to access the service. Let’s try it out by running the command curl 34.88.159.3:7777 in the terminal.
curl 34.88.159.3:7777Server 6252: What did baby corn say to mama corn? -- Where's pop corn?curl 34.88.159.3:7777Server 6252: What did baby corn say to mama corn? -- Where's pop corn?curl 34.88.159.3:7777Server 6252: Why are eggs bad at handling stress? -- They crack under pressure. 
Continuation steps and improvements
Above, we manually created a deployment and a service. In reality, much of the deployment process would be automated. For instance, we could use a GitOps-flow to automatically deploy the application when changes are pushed to a repository.
In addition, we would want to set up a domain for the application, configure the domain to point to the load balancer, and set up certificates to allow using HTTPS.
The Google Cloud documentation at https://cloud.google.com/docs/get-started offers plenty of resources for this.
Although we’ve used Google Cloud here, the underlying principles are the same across cloud providers. We create a cluster, add an image to a registry, create a deployment with the image, and expose the deployment with a service. Subsequent steps such as adding a domain, creating an ingress with HTTPS support, and so on, also function similarly across the cloud providers.
Cleaning up
If you followed the above steps and created your own Kubernetes deployment, you want to dismantle it to avoid any unnecessary costs (note the free tier though). We can delete the cluster by running the command gcloud container clusters delete autopilot-cluster-1 --zone europe-north1 --project dab-kubernetes-autopilot-demo, which deletes the cluster (and the deployments and services in it).
gcloud container clusters delete autopilot-cluster-1 --zone europe-north1 --project dab-kubernetes-autopilot-demoThe following clusters will be deleted. - [autopilot-cluster-1] in [europe-north1]
Do you want to continue (Y/n)?  Y
Deleting cluster autopilot-cluster-1...done.Deleted [https://container.googleapis.com/v1/projects/dab-kubernetes-autopilot-demo/zones/europe-north1/clusters/autopilot-cluster-1].
Next, we also clean up the artifact repository, which is done by the command gcloud artifacts repositories delete docker-images --location europe-north1.
gcloud artifacts repositories delete docker-images --location europe-north1You are about to delete repository [docker-images]
Do you want to continue (Y/n)?  Y
Delete request issued for: [docker-images]Waiting for operation [projects/dab-kubernetes-autopilot-demo/locations/europe-north1/operations/...] to complete...done.Deleted repository [docker-images].The same approach is used for larger applications. As an example, the outcome of the larger Kubernetes tutorial that started in the chapter Minikube and Kubectl of Containers & Kubernetes can be deployed to a cloud provider.
The key required changes would involve pushing the images to the cloud registry and updating the deployment and service configurations to use the images from the registry.
Databases
Similar to cloud computing providers for Kubernetes, there exists a wide variety of cloud database providers. These include companies that spesialize in databases such as PlanetScale and Supabase, as well as the key cloud computing providers that also offer databases as a service, including Google Cloud databases and AlloyDB, Amazon RDS, and Microsoft’s managed databases.
Managed databases can be a good choice for scaling an application, as they are typically readily optimized for high performance and availability, and come configured with backups, replication, and security. Naturally, they are also more expensive than self-hosted databases or databases installed on a virtual machine from an IaaS provider, but may lead to reduced costs due to the reduced need for in-house database server admins.
Serverless deployment
Next, let’s look at deploying the same application as above, but this time deploying it as a serverless service.
Setting up
Create a new project on Google Cloud and call it dab-serverless-jokes (you could name the project anything you want). Create an artifact registry to the project, and create a folder for docker images into the artifact registry. Similar to the Kubernetes example, we’ll call the repository “docker-images” and choose europe-north1 as the region.
Creating the image
We’ll use the same application as previously. The application is written in vanilla Deno and responds with jokes. The app.js file is as follows.
const jokes = [  "What did baby corn say to mama corn? -- Where's pop corn?",  "Why are eggs bad at handling stress? -- They crack under pressure.",];
const server = `Server ${Math.floor(10000 * Math.random())}`;
const handleRequest = async (request) => {  const joke = jokes[Math.floor(Math.random() * jokes.length)];
  return new Response(`${server}: ${joke}`);};
Deno.serve({ hostname: "0.0.0.0", port: 7777 }, handleRequest);
And the Dockerfile is as follows.
FROM denoland/deno:alpine-2.0.2
EXPOSE 7777
WORKDIR /app
COPY . .
CMD [ "run", "--unstable", "--allow-net", "app.js" ]
When in the folder that contains the above files, we run the command docker build -t jokes-app . to create the jokes-app image (if you followed the Kubernetes example, this is already done).
docker build -t jokes-app .... => => naming to docker.io/library/jokes-appPushing the image to the registry
We’ll again authenticate to the artifact registry using the command gcloud auth configure-docker europe-north1-docker.pkg.dev. This will add the credentials to the Docker config file, if they are not yet there.
gcloud auth configure-docker europe-north1-docker.pkg.devWARNING: Your config file at [/home/username/.docker/config.json] contains these credential helper entries:
{  "credHelpers": {    "europe-north1-docker.pkg.dev": "gcloud"  }}Adding credentials for: europe-north1-docker.pkg.devgcloud credential helpers already registered correctly.
Next, we tag the image by running the command docker tag jokes-app europe-north1-docker.pkg.dev/dab-serverless-jokes/docker-images/jokes-app:latest — the key difference to the Kubernetes example is that the project that we are working with is dab-serverless-jokes.
docker tag jokes-app europe-north1-docker.pkg.dev/dab-serverless-jokes/docker-images/jokes-app:latestOnce the image is tagged, we push it to the registry.
docker push europe-north1-docker.pkg.dev/dab-serverless-jokes/docker-images/jokes-app:latestThe push refers to repository [europe-north1-docker.pkg.dev/dab-serverless-jokes/docker-images/jokes-app]...latest: ...Now, the image jokes-app should be in the list of images in the artifact registry.
Going serverless
Next, we’ll go to Google Cloud Run and click the create service button. In the configuration, we choose “Deploy one revision from an existing container image”, and search the jokes-app image from the artifact registry. We select europe-north1 as the region, select the per request pricing, and limit the autoscaling to at most 5 instances (keeping the minimum number of instances at 0). We’ll allow all traffic to the service from the internet, and allow unauthenticated invocations.
If the minimum number of instances would be set to 1, the service would always have at least one instance running, which would reduce the cold start time.
Further, as we’ve created our application so that it listens to requests on port 7777, we need to adjust the container network settings. In the part on Container configuration, set the “Container port” as 7777, and allocate 128 MiB memory and one vCPU to the container.
We could also adjust the application so that it reads an environment variable
PORTand use that value.
We can keep the other options as they are by default, and then click the “Create” button. The application will take a while to start up. This creates a serverless application that is accessible over the internet. The URL to the service is available on the service details once the application has been created.
One example of the application is running at https://jokes-app-rqafkhjgta-lz.a.run.app.
curl https://jokes-app-rqafkhjgta-lz.a.run.app/Server 1044: What did baby corn say to mama corn? -- Where's pop corn?Google Cloud Run has a free tier of up to two million invocations per month, so contrary to the Kubernetes example that was immediately taken down, the above URL will be up and running at least for while.
As you may notice if you’ve followed the above example and opened the Google Cloud Run dashboard, there’s an option for setting up continuous deployment. This allows linking the application to a GitHub repository, and automatically deploying the application when changes are pushed to the repository.
Note that although the above applications are toy examples, the same principles could be used to build larger applications; we could also, for example, run parts of the application using Kubernetes, and parts of the application on a serverless platform, and rely on a cloud database (or few) to manage the application data.