Role-Based Access Control
Learning Objectives
- You understand Role-Based Access Control (RBAC).
- You know how to add roles to users in a database.
- You can include user roles in JWT tokens and extract them on the server.
- You know how to protect API endpoints based on user roles.
- You can conditionally show UI elements based on user roles.
Sometimes, applications require different levels of access for different users. For example, an application might have an administrator who can view and manage all users, while a regular user can only manage their own content. This is where Role-Based Access Control (RBAC) comes in.
Role-Based Access Control (RBAC) is a method of restricting access to certain parts of an application based on the role of the user. In RBAC, users are assigned roles, and these roles determine what actions the user can perform and what parts of the application they can access.
Common examples of roles include:
- Admin: Can manage all content and users
- Moderator: Can manage content but not users
- User: Can only manage their own content
- Guest: Can only view public content
In web applications, RBAC is typically implemented by (1) storing user roles in the database, (2) including roles in the JWT token when users log in, (3) checking roles on the server before allowing access to protected resources, and (4) using roles on the client to show or hide UI elements.
RBAC can be more complex than what we’ll cover here. For example, RBAC systems can include hierarchical roles where higher-level roles inherit permissions from lower-level roles, or fine-grained permissions where roles are associated with specific actions rather than broad categories. We’ll keep it simple for this introduction.
RBAC definition
0 / 5 points
What is Role-Based Access Control (RBAC)?
Adding roles to the database
To implement RBAC, we first need a way to store user roles in the database. Create a new database migration file called V7__user_roles.sql (adjust the version number to match your migration sequence) in the database-migrations folder:
CREATE TABLE user_roles ( id INTEGER GENERATED ALWAYS AS IDENTITY PRIMARY KEY, user_id INTEGER NOT NULL REFERENCES users(id), role TEXT NOT NULL, UNIQUE(user_id, role));The above adds a table user_roles to the database, which has a foreign key to the users table and a role column. The unique constraint UNIQUE(user_id, role) ensures that a user cannot have the same role twice in the database. Run the migration to create the table.
We could also have a separate table for roles, but for simplicity, we’ll just use text values for roles in this example.
Now, we can add roles to users. As an example, if the id of the user is 1, we can add the ADMIN role to that user with the following SQL command:
INSERT INTO user_roles (user_id, role) VALUES (1, 'ADMIN');Role storage
0 / 5 points
We store roles in a separate user_roles table with a foreign key to users, rather than adding a ‘role’ column to the users table. What flexibility does this design provide?
Including roles in JWT tokens
To make roles available throughout the application, we include them in the JWT token when users log in. This way, the server can check the user’s roles without querying the database on every request.
Modify the authRepository.js to include a function to fetch user roles:
// ...
const getUserRoles = async (userId) => {  const result = await sql`    SELECT role FROM user_roles WHERE user_id = ${userId}  `;
  return result.map((row) => row.role);};
// remember to export the function
The above function reads all roles for a given user from the database and returns them as an array of strings.
Then, update the login function in authController.js to fetch and include roles in the token:
// ...
const login = async (c) => {  const user = await c.req.json();
  const foundUser = await authRepository.findByEmail(user.email);  if (!foundUser) {    return c.json({ error: "Invalid email or password" }, 401);  }
  const isValid = verify(user.password, foundUser.password_hash);  if (!isValid) {    return c.json({ error: "Invalid email or password" }, 401);  }
  const roles = await authRepository.getUserRoles(foundUser.id);  const payload = { email: foundUser.email, id: foundUser.id, roles };  const token = await jwt.sign(payload, JWT_SECRET);
  return c.json({    message: "Login successful",    user: payload,    token,  });};
Now, when users log in, their JWT token contains their roles. The roles are also included in the user object returned to the client.
Including roles in JWT payload
0 / 5 points
Which statements are true about including roles in JWT tokens? (Select all that apply)
Showing roles in the user interface
Now as the roles are included in the user object returned to the client, we can show them in the user interface. Update the layout src/routes/+layout.svelte to show the user roles, if they have any:
<script>  import { useAuthState } from "$lib/states/authState.svelte.js";  let { children } = $props();  const authState = useAuthState();</script>
<header>  {#if authState.user}    <div>      <span>        Hello, {authState.user.email}!        {#if authState.user.roles?.length}          (Roles: {authState.user.roles.join(", ")})        {/if}      </span>      <button onclick={() => authState.logout()}>Logout</button>    </div>  {:else}    <ul>      <li><a href="/auth/login">Login</a></li>      <li><a href="/auth/register">Register</a></li>    </ul>  {/if}</header>
<main>  {@render children()}</main>
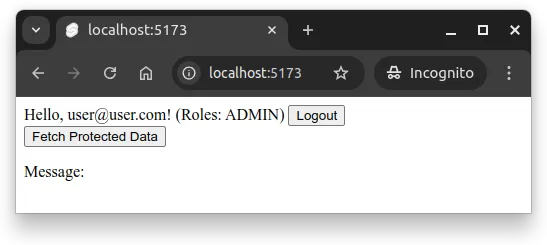
Now, if the user has roles, they are displayed next to their email, as shown in Figure 1 below.
Protecting API endpoints with roles
Now that roles are included in the JWT token, we can use them to protect API endpoints. Let’s create an admin-only endpoint that allow administrators to view all users in the system.
Creating role-checking middleware
First, let’s create a reusable middleware function that checks if a user has a required role. Add this to the middlewares.js:
const requireAnyRole = (...requiredRoles) => {  return async (c, next) => {    const user = c.get("user");
    if (!user) {      return c.json({ error: "Authentication required" }, 401);    }
    if (      !user.roles || !user.roles.some((role) => requiredRoles.includes(role))    ) {      return c.json({ error: "Insufficient permissions" }, 403);    }
    await next();  };};
// remember to export the function
The middleware is a factory function — a function that returns a function — that allows creating customized middleware for different role requirements. For example, the call requireAnyRole("ADMIN", "MODERATOR") would create a middleware function that verifies that the user has either the ADMIN or MODERATOR role. If the user does not have any of the required roles, the middleware responds with a 403 Forbidden status code. If the user is not authenticated, it responds with a 401 Unauthorized status code.
401 vs 403
0 / 5 points
When should a protected endpoint return 401 Unauthorized versus 403 Forbidden?
Admin endpoint for viewing all users
Then, let’s create the functionality for viewing users in the system. First, create a file called userRepository.js and add the following function to fetch all users along with their roles:
import postgres from "postgres";
const sql = postgres();
const getAllUsers = async () => {  return await sql`    SELECT      users.id,      users.email,      users.created_at,      array_agg(user_roles.role) FILTER (WHERE user_roles.role IS NOT NULL) as roles    FROM users    LEFT JOIN user_roles ON users.id = user_roles.user_id    GROUP BY users.id, users.email, users.created_at    ORDER BY users.created_at DESC  `;};
export { getAllUsers };
This query fetches all users and aggregates their roles into an array. Users without roles will have an empty array.
The array_agg is a PostgreSQL-specific function.
Then create a controller for users called userController.js and place the following content to the file.
import * as userRepository from "./userRepository.js";
const getAllUsers = async (c) => {  const users = await userRepository.getAllUsers();  return c.json(users);};
export { getAllUsers };
Finally, wire up the endpoint in app.js with role protection:
// ...
import * as userController from "./userController.js";
// Admin-only routesapp.use("/api/admin/*", middlewares.authenticate, middlewares.requireAnyRole("ADMIN"));app.get("/api/admin/users", userController.getAllUsers);
export default app;
Notice above how we chain the authenticate and requireAnyRole("ADMIN") middleware to protect all routes starting with /api/admin. Only authenticated users with the ADMIN role can access these routes.
We could also implement the role functionality to the
authenticatemiddleware, but separating authentication and role checking into different middleware functions is cleaner.
Now, it would again be the time to test the API endpoint using e.g. curl. First, try accessing the endpoint without a token, then with a token of a user without the ADMIN role, and finally with a token of a user with the ADMIN role. You should see 401 Unauthorized, 403 Forbidden, and 200 OK responses, respectively.
Admin API for todo statistics
0 / 25 points
In this exercise, your task is to provide an admin API endpoint for retrieving statistics about todos and tasks in the system, building on the earlier todos and tasks exercises. The endpoint should be protected so that only users with admin privileges can access it.
Follow the example set out in the materials for adding roles to users. The roles should be stored in a table called user_roles, which looks as follows, and which corresponds to the table in the materials.
CREATE TABLE user_roles ( id INTEGER GENERATED ALWAYS AS IDENTITY PRIMARY KEY, user_id INTEGER NOT NULL REFERENCES users(id), role TEXT NOT NULL, UNIQUE(user_id, role));Expectations
Take your solution to the exercise “API for personalized todos and tasks”, and modify the API so that users have roles and so that users with the “ADMIN” role can access the following endpoint:
- GET /api/admin/stats
The response from the endpoint should be a JSON object with the following structure, where todos is the total number of todos in the system and tasks is the total number of tasks in the system.
{ "todos": 100, "tasks": 250}Include the roles to the application as shown in the materials, and add a new middleware for checking admin privileges. The middleware should check that the user has the “ADMIN” role. If the user does not have the “ADMIN” role, the middleware should respond with a 403 status code and the message “Insufficient permissions”.
Testing and submission
Once ready, test the API by curling it. When you observe that it works, zip the contents of your server-side project folder and return the zip here. The zip should include the following files:
.├── app.js├── app-run.js├── authController.js├── authRepository.js├── middlewares.js├── taskController.js├── taskRepository.js├── todoController.js└── todoRepository.jsAdditional files (e.g., new files for the admin functionality, deno.json, migration files) can also be included, but the above files must be present. If you omit files that are in your own setup, make sure that they are not necessary for running the application.
Using roles on the client
Now that we have role-based endpoints on the server, let’s update the client to conditionally show UI elements based on user roles.
Showing a link to an admin page
Let’s update the layout to show an admin link for users with the admin role. Update src/routes/+layout.svelte:
<script>  import { useAuthState } from "$lib/states/authState.svelte.js";  let { children } = $props();  const authState = useAuthState();</script>
<header>  {#if authState.user}    <div>      <span>        Hello, {authState.user.email}!        {#if authState.user.roles?.length}          (Roles: {authState.user.roles.join(", ")})        {/if}      </span>      {#if authState.user.roles?.includes("ADMIN")}        <ul>          <li><a href="/admin">Admin</a></li>        </ul>      {/if}      <button onclick={() => authState.logout()}>Logout</button>    </div>  {:else}    <ul>      <li><a href="/auth/login">Login</a></li>      <li><a href="/auth/register">Register</a></li>    </ul>  {/if}</header>
<main>  {@render children()}</main>
The link to the admin pages only shown to users who have the “ADMIN” role. The ?. optional chaining ensures we don’t get an error if roles is undefined. Let’s next create the admin page.
Client-side role checks
0 / 5 points
We hide admin UI elements for non-admin users with {#if authState.user.roles?.includes(“ADMIN”)}. Why isn’t this sufficient security on its own?
Creating an admin page
Now let’s create an admin page that displays all users. Create src/routes/admin/+page.svelte and place the following content to it. For simplicity, as the focus is on demonstrating role-based access control, we go with a naive page that just lists the users and their roles. In a real application, you would likely want to add more functionality, such as editing user roles or deleting users.
<script>  import { useAuthState } from "$lib/states/authState.svelte.js";  import { authFetch } from "$lib/utils/fetchUtils.js";  import { PUBLIC_API_URL } from "$env/static/public";  import { goto } from "$app/navigation";
  const authState = useAuthState();  let users = $state([]);
  const loadUsers = async () => {    const response = await authFetch(`${PUBLIC_API_URL}/api/admin/users`);    users = await response.json();  };
  $effect(() => {    // this could go to a layout file, with a redirect to home if not admin    if (!authState.user || !authState.user.roles?.includes("ADMIN")) {      return;    }
    loadUsers();  });</script>
<h1>Users</h1>
<ul>{#each users as user}  <li>{user.email} - Roles: {user.roles?.join(", ")}</li>{/each}</ul>
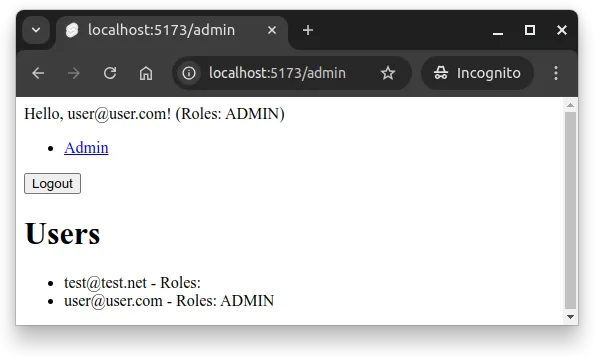
Now, the application shows an admin link in the header for users with the “ADMIN” role. Clicking the link takes the user to the admin page, which fetches and displays all users from the server. In Figure 2 below, the system has two users, one with the ADMIN role and one without.
Client-side use of roles
0 / 5 points
How can user roles be utilized on the client side in a web application? (Select all that apply)
Guarding the admin page
To check that only users with the “ADMIN” role can view the admin page, we can add +page.js file to the src/routes/admin folder with the following content:
import { browser } from "$app/environment";import { error } from "@sveltejs/kit";
export const load = () => {  if (browser) {    const user = localStorage.getItem("user");    if (!user) {      throw error(401, "Unauthorized");    }
    const roles = JSON.parse(user).roles || [];    if (!roles.includes("ADMIN")) {      throw error(403, "Forbidden");    }  }};
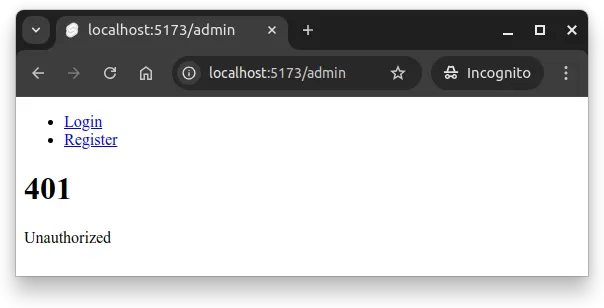
Now, when a user navigates to the page, the load function checks if the user has the “ADMIN” role. If not, it throws an error, which SvelteKit handles by showing an error page.
Note that this is a basic client-side check and that any knowledgeable user could add a role to their local storage and view the page. The real protection is on the server side with the role-checking middleware we added earlier. The client-side check is mainly for user experience, to avoid showing a page that the user should not use.
Now, when an unauthorized user tries to access the admin page, they see an error message like in Figure 3 below.
Client-side admin page guard
0 / 5 points
How does the admin page guard prevent unauthorized access on the client?
Summary
In summary:
- Role-Based Access Control (RBAC) restricts access to parts of an application based on user roles (e.g., Admin, Moderator, User).
- User roles are stored in a separate database table with a foreign key to the users table, allowing users to have multiple roles.
- Roles should be included in the JWT payload during login, making them available throughout the application without additional database queries.
- Role-checking middleware can be implemented as a factory function that returns middleware checking for specific roles, enabling reusable and flexible access control.
- API endpoints can be protected by chaining authentication and role-checking middleware, returning 401 for unauthenticated requests and 403 for insufficient permissions.
- User interfaces should conditionally show elements based on roles (e.g., admin links only for admins), improving user experience.
- Client-side route protection using the
loadfunction provides an additional layer of user experience, but server-side role checking is essential for actual security.
AI Study Aid
Create a chapter diagram
We're looking into to what extent AI-generated diagrams could help with studying.
Use this study aid to generate an AI-generated visual summary of the material you just studied.
Each diagram style emphasizes the content in a different way, so you can choose the focus
that feels most useful.
Using the diagram generator is voluntary and does not affect your course progress. We encourage
you to try it out and see if it helps, but it's totally up to you! Your answers help us understand
how to make better study aids in the future.
Client-side admin page
0 / 20 points
In this exercise, your task is to create an admin page to the todo application that is available only for users with the ADMIN role.
Starting point
Continue from the exercise “Client-side personalized todos and tasks”, using the “Admin API for todo statistics exercise” for the backend.
The API at /api/admin/stats is accessible to users with ADMIN role. It returns a JSON object with the following structure, where todos is the total number of todos in the system and tasks is the total number of tasks in the system.
{ "todos": 100, "tasks": 250}Task
Implement an admin page at the route /admin that shows the statistics from the admin API endpoint /api/admin/stats. The page should only be accessible to users with the ADMIN role. If a registered user who does not have the ADMIN role tries to access the page, they should be shown a message “Access denied” with the HTTP status code 403. If an anonymous user (not logged in) tries to access the page, they should be redirected to the login page.
There is no need to show the roles in the user interface, or to provide a link to the admin page.
Show the statistics in a paragraph with the text “Todos: 100, tasks: 250”, where 100 and 250 are the numbers retrieved from the API.
Use the authFetch helper function from the fetchUtils.js module to make the authenticated request to the API.
Create at least the folder src/routes/admin with the files +page.svelte and +page.js. You can create additional files as needed.
Submission format
Once ready, test your application with the API for personalized todos and tasks, and when you observe that it works, zip the contents of the folder client/src and return the zip here. The zip should not contain the client/src folder, but the contents of the client/src folder. The contents of the zip should be as follows (additional files can be added).
.├── lib│ ├── apis│ │ ├── authApi.js│ │ ├── tasksApi.js│ │ └── todosApi.js│ ├── components│ │ └── todos│ │ ├── Task.svelte│ │ ├── TaskForm.svelte│ │ ├── TaskList.svelte│ │ ├── Todo.svelte│ │ ├── TodoForm.svelte│ │ └── TodoList.svelte│ ├── states│ │ ├── authState.svelte.js│ │ ├── taskState.svelte.js│ │ └── todoState.svelte.js│ └── utils│ └── fetchUtils.js└── routes ├── admin │ ├── +page.js │ └── +page.svelte ├── auth │ └── [action] │ ├── +page.js │ └── +page.svelte ├── todos │ ├── [todoId] │ │ ├── tasks │ │ │ └── [taskId] │ │ │ ├── +page.js │ │ │ └── +page.svelte │ │ ├── +page.js │ │ └── +page.svelte │ ├── +page.js │ └── +page.svelte ├── +layout.svelte └── +page.svelte