Tracking Users with Cookies
Learning Objectives
- You know how to use cookies to track users in an application.
- You know how to set cookies in the API, and re-set them in the server responsible for the client-side application.
- You know how to extract cookie values from the request and make them available for Svelte components.
At this point, we have the functionality for registration and authentication, but the users are not yet tracked in the application. In this chapter, we look into using cookies to track users.
Using cookies
Cookies are small pieces of data that the server instructs the browser to store. When a user makes a request to the server, the server can respond with a Set-Cookie header to instruct the browser to store a cookie. The browser will then include the cookie in all subsequent requests to the server.
Hono has built-in cookie helpers that can be used to set and get cookies.
import { getCookie, setCookie } from "jsr:@hono/hono@4.6.5/cookie";The getCookie function takes the Hono request context and the name of the cookie as parameters, and returns the value of the cookie with the given name. The setCookie function, on the other hand, takes the Hono request context, the name of the cookie, the value of the cookie, and optional cookie options as parameters, and sets the cookie with the given name and value.
Cookie values are always stored as strings, even for numerical values, which need to be parsed into integers when retrieved. That is, if we would want to use an integer from a cookie, it is stored as a string, and it needs to be parsed to an integer when retrieved from the cookie.
The following shows an example of a Hono application that uses cookies to keep track of the number of times the user has visited the application.
import { Hono } from "jsr:@hono/hono@4.6.5";
import { getCookie, setCookie } from "jsr:@hono/hono@4.6.5/cookie";

const app = new Hono();

const COOKIE_KEY = "count";

app.get("/count", async (c) => {
  let count = getCookie(c, COOKIE_KEY);
  count = count ? parseInt(count) + 1 : 1;
  setCookie(c, COOKIE_KEY, count);
  return c.json({ count });
});

export default app;
When we run the application and make a request to the /count endpoint with a browser, the application responds with the count and a set-cookie header. Then, on subsequent requests with the cookie value, the count is incremented. We can also simulate the requests with curl, setting the cookie through the header.
curl -v localhost:8000/count
// ...
< set-cookie: count=1; Path=/
// ...
{"count":1}%
curl -v -H "Cookie: count=1" localhost:8000/count
// ...
< set-cookie: count=2; Path=/
// ...
{"count":2}%
As cookie values are strings, we can adjust the value as we wish. Below, we make a request, where we set the cookie value to 41.
curl -v -H "Cookie: count=41" localhost:8000/count
// ...
< set-cookie: count=42; Path=/
// ...
{"count":42}%Cookies, cross-origin requests, and credentials
To use cookies in an application that makes cross-origin requests, we need to modify the cors middleware to explicitly set the origin of the request and allow credentials to be passed in the request.
If the application is running on http://localhost:5173, the cors middleware would be set up as follows:
const app = new Hono();
app.use(
  "/*",
  cors({
    origin: "http://localhost:5173",
    credentials: true,
  }),
);
In production use, the origin would be passed from an environment variable, as the origin can change depending on the environment.
Furthermore, we need to set the cookie options to allow the cookie to be passed in cross-origin requests. For the cookie options, we use the following values:
- domain: the domain the cookie is valid for (e.g.
localhostfor development purposes) - path: the path the cookie is valid for (in our case, all paths, i.e.
/) - httpOnly: if the cookie should be accessible only through HTTP requests (in our case, yes, i.e.
true) - sameSite: the same-site policy for the cookie (in our case,
lax)
For additional information on the cookie options, see Set-Cookie documentation on MDN Web Docs.
Coming back to our earlier authentication API, we could set a cookie when the user logs in as follows.
// ...
import { getCookie, setCookie } from "jsr:@hono/hono@4.6.5/cookie";
// ...

const COOKIE_KEY = "auth";
// ...

app.post("/api/auth/login", async (c) => {
  const data = await c.req.json();

  const result = await sql`SELECT * FROM users
    WHERE email = ${data.email.trim().toLowerCase()}`;

  if (result.length === 0) {
    return c.json({
      "message": "User not found!",
    });
  }

  const user = result[0];

  const passwordValid = verify(data.password.trim(), user.password_hash);
  if (passwordValid) {
    // setting the cookie as the user id
    setCookie(c, COOKIE_KEY, user.id, {
      path: "/",
      domain: "localhost",
      httpOnly: true,
      sameSite: "lax"
    });
    return c.json({
      "message": `Logged in as user with id ${user.id}`,
    });
  } else {
    return c.json({
      "message": "Invalid password!",
    });
  }
});
Above, when the user logs in, the user id is set as the value for the cookie identified with COOKIE_KEY. Now, the response from the server has the Set-Cookie header, which instructs the browser to store the cookie.
When we try the application from the command line, we can see the Set-Cookie header in the response.
curl -v -X POST -d '{"email": "test@test.com", "password": "secret"}' localhost:8000/api/auth/login
// ...
> POST /api/auth/login HTTP/1.1
// ...
< HTTP/1.1 200 OK
< access-control-allow-credentials: true
< set-cookie: auth=1; Domain=localhost; Path=/; HttpOnly; SameSite=Lax
// ...

{"message":"Logged in as user with id 1"}%Cookies and form actions
The request to the authentication API is made from the server responsible for the client-side application. This means that the response with the Set-Cookie header from the authentication API is not directly available for the browser. To set the cookie on the client, we need to adjust the form actions to capture the cookie from the request, and then set the cookie in the client.
To do this, we must modify the login action to include the cookie in the response. The object passed to the actions by SvelteKit has a cookies object that can be used to set cookies. Similarly, the headers object has a getSetCookie method that can be used to get the Set-Cookie header from the response.
The
getSetCookiereturns an array of cookies, as there can be multiple cookies set in the response. Thus, the array needs to be iterated over to find the cookie with the correct name.
The following shows the key changes to the login action in the +page.server.js file. Now, the function extracts the cookies from the response headers, finds the cookie with the correct name, and sets the cookie in the client. The secure option is set to false to allow the cookie to be set in development (i.e., without “https”).
// ...
const COOKIE_KEY = "auth";
// ...
  login: async ({ request, cookies }) => {
    const data = await request.formData();
    const response = await apiRequest(
      "/api/auth/login",
      Object.fromEntries(data),
    );

    if (response.ok) {
      const responseCookies = response.headers.getSetCookie();
      const cookie = responseCookies.find((cookie) =>
        cookie.startsWith(COOKIE_KEY),
      );
      const cookieValue = cookie.split("=")[1].split(";")[0];
      cookies.set(COOKIE_KEY, cookieValue, { path: "/", secure: false });
      throw redirect(302, "/");
    }

    return response;
  },
// ...
The
cookie.split("=")[1].split(";")[0]takes the matching cookie, splits it by the equal sign, taking the part that contains the cookie value. Then, it further splits the part by semicolon to get the actual value of the cookie.
With this change, when we login to the application, we are redirected to the home page. The cookie is now set in the browser, and the user could be tracked by the application.
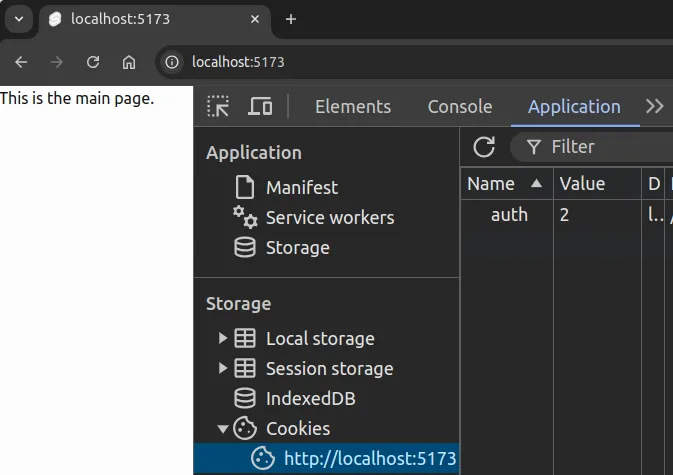
The set cookie values can be viewed in the browser’s developer tools. In Chrome, the cookies can be viewed by right-clicking on the page, selecting “Inspect”, and then navigating to the “Application” tab. The cookies are listed under the “Cookies” section.
This highlights why cookies should not store sensitive information.
In Figure 1, we see the cookie with the name auth and the value 2, which corresponds to the id of a user who has logged in.

Cookie values on the client
To extract and show cookie values on the client, we need to extract the cookie values from the request, and make them available for Svelte. To do this, we use hooks, which are functions that run on every request (similar to middleware).
Hooks
Hooks can be used to extract the cookie values from the request and make them available for Svelte components.
To extract the cookie values from the request, create a hooks.server.js file and place it in the src folder of the client-side project. Place the following content to the file.
const COOKIE_KEY = "auth";

export const handle = async ({ event, resolve }) => {
  const authCookie = event.cookies.get(COOKIE_KEY);
  if (authCookie) {
    event.locals.user = authCookie;
  }

  return await resolve(event);
};
The above defines a hook that is run on each request. On each request, before handling the request, the hook extracts a cookie with the name auth from the request. If the cookie is found, the value of the cookie is set in the locals object of the request. Then, the request is handled.
With the above, the cookie value is available as a variable user in the locals object that is available for the duration of the request on the server responsible for the client-side application.
Exposing cookie value to the layout
When using user information that should be available throughout the application, we take the user information into use in the layout. To do this, we create a server-side file that exposes the locals object, and then modify the layout to use the data.
Create a file +layout.server.js in the folder src/routes and place the following content in the file.
export const load = async ({ locals }) => {
  return locals;
};
The above exports the locals object, which makes contents of the locals object available in the layout component as the property data.
Next, modify the +layout.svelte file of the application to receive data as a property (i.e., value of locals from the load function), which may contain the user. Further, modify the layout so that it shows the user if the user is set.
<script>
  import "../app.css";
  let { children, data } = $props();
</script>

{#if data.user}
  <p>Hello {data.user}!</p>
{/if}

<main class="container mx-auto max-w-lg">
  {@render children()}
</main>
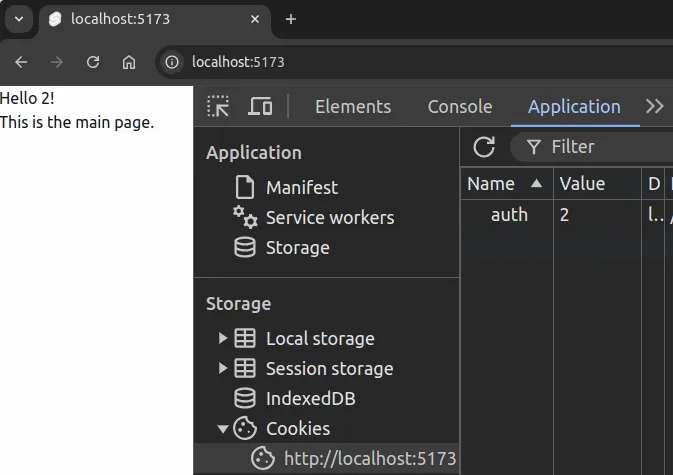
Now, when we log in as a user with the id 2, the user id is shown in the layout, as shown in Figure 2.

If there is no need to expose the cookie value to the layout, one can also expose locals through a load function from +page.server.js and use the cookie value in the page component.
User state
To further expose the user information to all parts of the application, we draw on the functionality discussed in the chapter on Sharing State Between Components, creating a user state object that can be shared across the application.
Create a file called userState.svelte.js in the folder src/lib/states and place the following content in the file.
let user = $state({});

const useUserState = () => {
  return {
    get user() {
      return user;
    },
    set user(u) {
      user = u;
    },
  };
};

export { useUserState };
Now, import it to the layout file, and set the user in the layout.
<script>
  import { useUserState } from "$lib/states/userState.svelte.js";
  import "../app.css";

  let { children, data } = $props();

  const userState = useUserState();
  if (data.user) {
    userState.user = data.user;
  }
</script>

{#if data.user}
  <p>Hello {data.user}!</p>
{/if}

<main class="container mx-auto max-w-lg">
  {@render children()}
</main>
Now, the user is available in the userState object, and can be accessed in Svelte components.
There is a relatively big problem with the approach, however. Anyone can edit the value of the cookie in the browser, allowing them to impersonate other users. To prevent this, let’s use JWTs, which we will discuss in the next chapter.