Role-Based Access Control
Learning Objectives
- You know of Role-Based Access Control (RBAC).
- You know of the possibility of creating a web application that uses user roles to decide what to show and what the user can access.
Sometimes, applications require different levels of access for different users. For example, an application might have an administrator role that can access all parts of the application, while a regular user can only access some parts. This is where Role-Based Access Control (RBAC) comes in.
Role-Based Access Control (RBAC) is a method of restricting access to certain parts of an application based on the role of the user. In RBAC, users are assigned roles, and these roles determine what parts of the application the user can access.
There’s actually a bit more to RBAC. For example, RBAC can also include hierarchical roles where higher-level roles inherit permissions from lower-level roles. We’ll keep it simple here though.
In web applications, RBAC can be implemented in various ways. One common way is to store the user’s role in a JSON Web Token (JWT) when the user logs in. The server can then check the user’s role in the JWT when the user tries to access a protected part of the application, and the role can also be used to conditionally show parts of the user interface.
To walk through how to implement RBAC in a web application, we demonstrate how an application could include roles. To get started, we need a way to distinguish user roles — for this, we create a new database migration file called V8__user_roles.sql (or some other version number) into the database-migrations folder of the walking skeleton. For the roles, we use the following table.
CREATE TABLE user_roles (
  id SERIAL PRIMARY KEY,
  user_id INTEGER NOT NULL REFERENCES users(id),
  role TEXT NOT NULL,
  UNIQUE(user_id, role)
);
The above adds a table user_roles to the database, which has a foreign key to the users table and a role column. The unique constraint UNIQUE(user_id, role) ensures that a user cannot have the same role twice in the database.
Then, restart the walking skeleton to run the database migration.
Adding roles to JWT token
To add roles to the JWT token, we would modify the endpoint used for logging in the user. The simplest way is to retrieve the roles for the user from the database after we have verified the user’s credentials, and then add the roles to the JWT token.
app.post("/api/auth/login", async (c) => {
  // ...

  if (passwordValid) {
    const rolesResult = await sql`SELECT role FROM user_roles
      WHERE user_id = ${user.id}`;
    const roles = rolesResult.map((r) => r.role);

    const payload = {
      id: user.id,
      roles,
      exp: Math.floor(Date.now() / 1000) + 60 * 60 * 24 * 7,
    };

    const token = await jwt.sign(payload, JWT_SECRET);

    // ...
Now, when the user authenticates, the JWT will contain the user’s roles in a list.
Roles in the client-side application
Once the user authenticates, the roles are available for use in the client-side application, if the application has the features that we built into it in the previous chapters. That is, we already decode the JWT token from the cookie and set the payload as the value of the user property of the event.locals variable.
// ...
    try {
      const payload = decodeJwt(cookieValue);
      event.locals.user = payload;
    } catch (e) {
      console.log(e);
    }
// ...
In addition, the +layout.server.js already exposes the user object to the client-side application.
export const load = async ({ locals }) => {
  return locals;
};
And the +layout.svelte takes the user from the data passed to it as a property, and stores it in the user state for all components to use.
<script>
  import { useUserState } from "$lib/states/userState.svelte.js";
  import "../app.css";

  let { children, data } = $props();

  const userState = useUserState();
  if (data.user) {
    userState.user = data.user;
  }
</script>

{#if data.user?.id}
  <p>Hello {data.user?.id}!</p>
{/if}

<main class="container mx-auto max-w-lg">
  {@render children()}
</main>
Showing roles in the user interface
To show the roles of the user, we can, for example, modify the +layout.svelte to create a list of the roles.
{#if data.user?.id}
  <p>Hello {data.user?.id}!</p>
  <p>Your roles are: {data.user?.roles.join(", ")}</p>
{/if}
To see roles, add a few rows to the user_roles table in the database that correspond to the user that you log in with. As an example, if we have a user with the id 2, we could e.g. add the role “ADMIN” to the user.
docker exec -it postgresql_database psql
psql (17.0 (Debian 17.0-1.pgdg120+1))
Type "help" for help.

database=# INSERT INTO user_roles (user_id, role) VALUES (2, 'ADMIN');
INSERT 0 1
database=# \q
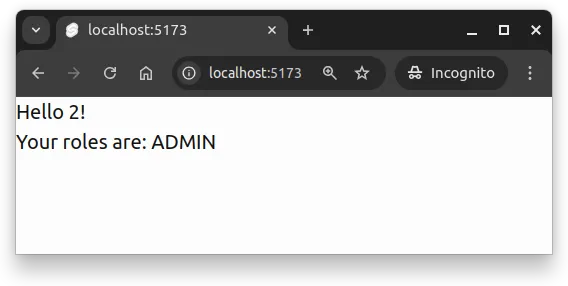
Now, when the user with the id 2 logs in again, the user will see “Your roles are: ADMIN” on the page, as show in Figure 1. Logging in again is required, as the roles are added to the JWT token when the user logs in.

Conditionally showing parts of the user interface
Now, on the client, the roles can be used to conditionally render parts of the user interface. For example, if the user has an admin role, we could show a link to an admin panel for the user.
{#if data.user?.roles?.includes("ADMIN")}
  <p><a href="/admin">Admin panel</a></p>
{/if}
Similarly, on the path /admin, we could protect the route on the server responsible for the client-side application. This would be done by adding a file called +page.server.js to a folder called admin in the src/routes folder, and adding the following content to it.
import { error } from "@sveltejs/kit";

export const load = ({ locals }) => {
  if (!locals?.user?.roles?.includes("ADMIN")) {
    throw error(401, "Unauthorized.");
  }

  return locals;
};
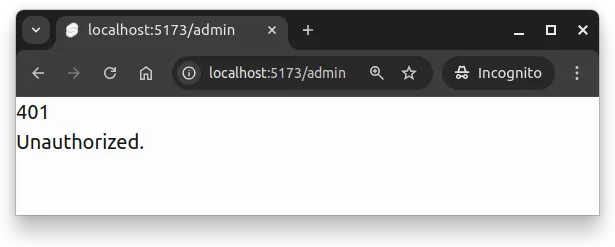
Now, if a user without the admin role tries to access the /admin path, they will see an error, as shown in Figure 2.

The above works because the locals are set in the hooks.server.js, and they will be available for the request in all server-side code. This includes the +page.server.js file, which is run before the page is rendered on the client.
Roles on the server
Users’ roles can be also used to restrict access to API endpoints on the server. There are a few ways to do this, where one would be to create an access control list (ACL) that maps the endpoints to roles that are allowed to access the endpoints.
const accessControlList = {
  "/api/admin": ["ADMIN"],
};
And then creating a middleware that checks the user’s roles against the ACL.
const aclMiddleware = async (c, next) => {
  const roles = accessControlList[c.req.path];
  if (!roles) {
    await next();
    return;
  }

  if (!c.user?.roles) {
    c.status(401);
    return c.json({ error: "Unauthorized" });
  }

  if (!c.user.roles.some((r) => roles.includes(r))) {
    c.status(403);
    return c.json({ error: "Forbidden" });
  }

  await next();
};

app.use("*", aclMiddleware);
The middleware and the access control list could also be more complex, including checking for specific methods (e.g., GET, POST, PUT, DELETE) and more complex roles.
For the above to work, we would need to place the middleware after the user middleware, and modify the user middleware so that the user — if it exists — is set to the context regardless. This would look as follows.
const userMiddleware = async (c, next) => {
  const token = getCookie(c, COOKIE_KEY);
  if (!token) {
    await next();
    return;
  }

  const { payload } = jwt.decode(token, JWT_SECRET);
  c.user = payload;
  await next();
};

app.use("*", userMiddleware);For convenience, the routes can be named in a way that makes it easier to check the roles. For example, for admin functionality, the routes could start with /api/admin, and so on. This approach works well for simple cases but may, e.g., not handle scenarios where roles overlap across unrelated routes.